THOUSANDS OF FREE BLOGGER TEMPLATES

Friday, April 1, 2011

A product review for Pro Photo Baseboards

Usually I post “how-to” tutorials but this time I have a great product review that I would love to rave about! When I first started photography I was fortunate enough that one of my very best friends was more than willing to help me out. Now I have the chance to return the favor to her.


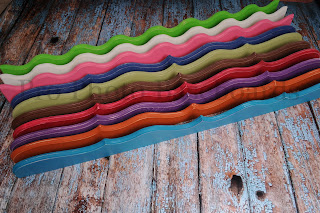
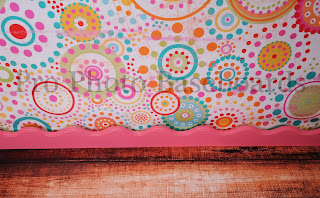
Introducing the all new funky, spunky and did I mention playful baseboards by Photo Prop Baseboards! These baseboards are 100% handcrafted and painted the baseboards are solid Oak, 5’feet long, 4inches high, and 3/4 inches thick. Prophoto Baseboards are non toxic, and you have the option of distressed or non distressed/solid finish. Did I mention you have 25 colors to choose from?! They are individually handcrafted which makes each baseboard unique in style. They are portable and lightweight use these to add flare to any type and style of backdrop. These baseboards are sure to become a staple within your everyday photography sessions. They are a breeze to set up and set to the side when not in use, how could you buy just one?! Some of these baseboards are currently in stock and ready to ship, and if you go to Photo Prop Baseboards on FB and like their page you will see that there is a nifty grand opening sale going on.


Photo prop Baseboards is ran by Michele Parsley and her oh so crafty woodworker husband. Side by side they are a force of nature in the photography world. It is just like them to be so innovative to come up with a fresh and exciting color palate for these gorgeous baseboards. So go on, indulge and buy one or three baseboards for your photography sessions. Michele also gives Boudoir workshops at Backdrop Outlet in Oceanside CA. If you are interested in taking her workshops sign up for notifications on Backdrop Outlets site as she works in close connection with them frequently.


Be on the lookout for new and exciting products coming to her etsy shop soon! You can purchase these baseboards in PhotoPropBaseboards on etsy (links below).


Facebook: http://www.facebook.com/pages/Pro-Photo-Baseboards/114168768662799

Etsy: http://www.etsy.com/shop/ProPhotoBaseboards?ref=si_shop

Michele’s Photography (family and children): http://www.micheleparsley.com/index2.php

Michele’s Boudoir Photography: http://www.boudoirforyou.com/#

Michele’s Event Photography: http://mpeventphotography.com/

And contact her via: prophotobaseboards@gmail.com

Wednesday, March 23, 2011

A product review and a how to on distressing photoprop furniture

This is a tutorial for distressing any type of furniture for photoprops.

A while back ago I bought a vintage doll bed from an antique store and paid a pretty penny for that distressed little number. After the first time I shot that bed I thought to myself, “I would like to have another one in a different color, but not for that price again!” I am an Etsy seller myself and I love to support the handmade community by purchasing via Etsy anytime that I can. So I stumbled across Quietude Quilts on Etsy and fell in love! They have unfinished (and finished as an option) doll beds that work fantastic as props! I bought an unfinished bed and decided to personalize it just to fit my style. This is a tutorial on how to distress your bed, never mind that it was done in my living room: P The photos are dark and were taken very quickly as my children were so over me having mommy time! Otherwise enjoy!

Supplies you will need:

-Paint of your choosing (you can purchase this at Wal Mart, Michaels, etc.) The bonus is this paint is non-toxic

-Paint brushes (I suggest one for each color of paint you purchase)

-Sand paper (I used a sandpaper block) do not buy a fine grain; get at least a medium if not high grain

-Steel wool (Again buy a medium grain steel wool, nothing fine)

-OPTIONAL- Stain (Can be colored or clear)


I actually forgot to take a picture of the bed before I got started as I was so eager, so Kelsey from Quietude Quilts let me borrow a picture of the bed that she took. Seen here:


Next I painted my base coat on my bed; I do at least 2 coats for a dark paint, 3 for a light paint color. If you are using the brand of paint that I did let dry in between coats about an hour. Shame on me but I forgot to take a picture of the bed with the base coat. As seen here:


After that step paint your top coat, you can paint only once if you like I painted my topcoat in 2 layers. However in the end I wished I only painted it once as it took that much longer to break through to the base coat with my steel wool. Top coat seen here:


After you have let your bed dry for about 24 hours you are ready to start the distressing technique. Start by sanding all of the edges of your bed. I recommend you sand down only to the base coat because later when you go over it with your steel wool you may accidentally (or on purpose) sand down to the actual grain and raw layer of the wood. It really is all personal preference.

Next grab your steel wool and get to work! This process will by far take the most patience, strong arms, and work! Here it is pictured after the steel wool process!


OPTIONAL-You can stain your bed with a clear coat by just painting it on, I suggest something that is not high gloss but matte. To give it more of a personal spin and an antique look grab a darker stain and a rag and very lightly dab some stain on your rag. Now wipe your bed with the stain, let sit for about 5 min. then take a dry rag and wipe away the stain. This adds more of a darker vintage look to it. Last optional tidbit grab a ball peen hammer, tie a rag around it so that it makes it a little less blunt and you won’t remove paint and hammer some dents in your bed to give it more depth and that vintage feel. You can even go over the dried stain one more time with your steel wool.


And here is the bed in action!


Kelsey from Quietude Quilts would like everyone to know that they offer milk base organic paint for the beds and you can add that as one of your options before buying. Also when they run out of beds for the week they restock by Sunday at 10pm EST and relist them on Etsy. She also offers custom bedding for these beds as well. Did I mention I love my new bed!


You have permission to sell items that you have made from this tutorial however you do not have permission to alter or resell my tutorial in anyway.

Contact Quietude Quilts at:
http://www.facebook.com/l.php?u=http%3A%2F%2Fwww.quietudequilts.etsy.com%2F&h=7a32aBlRswS0eomymRDQIl98qHg
www.facebook.com/QuietudeQuilts
QuietudeQuilts@gmail.com


Tuesday, March 8, 2011

This is a tutorial for my “Dust Bunny” my dust bunnies are made in all sorts of different styles, fashions, and ways. However I make these tutorials in a simplified manner so that any person can feel as though they can make these products! So although some of my dust bunnies are made as hammock dust bunnies, and in a totally different fashion, here I have simplified the technique. This is a style that is very simple for even the most uncrafty photographers out there! Make your props on your own and on a budget and get the satisfaction of completing these “high end” looking products on your own!


First step gather your supplies, you will need:

-Yarn (your color choices, and as many different styles as you like).

-Crochet hook (I used size --) don’t worry if you can’t crochet just omit this step I will explain how to make it even if you do not know how to crochet!

-Baking sheet (or two, etc)

-Scissors

-Scotch Tape


Step 2: Now you are ready to begin! I chain stitched about 40 stitches to make my dust bunny the desired length in order to cover the front of my basket (photo prop). If you do not know how to crochet no worries! Just braid your yarn to the desired length! As shown:


Step 3: Next grab your baking sheet and cut another piece of yarn to run the length of the top of your baking sheet. Make sure your yarn hangs down over the side of the baking sheet about an inch or inch and a half. Scotch tape this piece of yarn down on both sides of the baking sheet and probably one piece up at the top in the middle to hold your yarn down. Like so:
Step 4: Grab your yarn (I used several different styles and colors, use as many as you like) drape it down the backside of your baking sheet letting the loose ends hang all the way to the bottom. I actually let them hang about an inch off of the bottom for this first round because it may pull up. Like so:

Step 5: Now continue wrapping your yarn around your baking sheet, this is what it looks like wrapped around several times.


Continue this with your yarn (wrapping around) until you feel you have the desired amount for your dust bunny. Ensure that you have left your yarn ends that you taped down on the sides uncovered. Like so:


Step 7: Grab the sides of your yarn piece that you taped down, pull the tape off of the yarn ends and make LOOSE knot at the top of your baking sheet and yarn. Like so:


Step 8: Cut along the BOTTOM of your baking sheet and wrapped ends of your yarn (this is not the top where you have gathered your yarn in the knot). Like so:

Step 9: Now that you have cut along the bottom, go back up to the top of your dust bunny and tighten that knot, this keep all of you yarn gathered and keeps your workflow and space nice and neat. It also helps to keep it like this throughout the last steps when gathering the pieces you want to insert within your chain. Pictured here:

Step 10: Now take that knotted yarn and lay out your yarn nice and straight this makes it easier when gathering your pieces in order to slip it through the holes when making your dust bunny. In this picture you will see two piles, what I did was use two different sizes of baking pans. This gives more depth to my dust bunny because I will have two different lengths thus adding volume and a more texturized look of my overall piece. Piles pictured here:


Step 11: Now pick out however many pieces from your piles of yarn that you would like inserted within every hole of the chain, or the braided links of your dust bunny. I gathered about 10-15 strands to insert in every hole, add more or less according to your desires. As pictured:


Step 12: This is the hole that you will be inserting your yarn pieces in (in your chain or braided link) Start with the first hole and then insert your yarn either every hole or every other hole. Never mind the band aid, I got into a fight with my glue gun and it won.


Step 12: In this step you can see I am pointing to the first hole where I inserted my yarn pieces. As shown:

Step 13: Now tie a knot with one of your yarn pieces, this ensures that your yarn will stay in place within your dust bunny hole. After all it will probably be pulled at, tossed aside, etc. during your shoots! As shown here:

So this is about what your dust bunny should look like after the first yarn insertion:


Keep inserting your yarn until you reach the length of your chain. Tie off at the end and voila! Ready for action!
(Processed with "Color Explosion" from MCP Actions)

I hope you enjoyed this tutorial, thank you to Morgan for featuring me on her blog at http://morgankervin.blogspot.com/

 Please follow my blog as I am just starting it up and it is a labor of love while my husband is deployed for a year to Afghanistan, Thank you! XO-Amy Jo

You have permission to sell the items made from this tutorial, feel free to share this free tut, I ask that you do not sell this tut or alter the tut and sell as your own. Also please give credit to my blog and Morgans when selling or advertising, thank you.


Guest blogger Amy Jo Wagner, is a stay at home mom, military wife, crafter, student and photographer. As a guest blogger she hopes to teach you all how to craft on a budget for personal use or photography use . Her current eye candy comes from Morgan Kervin, Rita of The CoffeeShop Blog and Pink Paisley Photography.


"My real job is being a stellar mother and wife, my hobbies are crafting and photographing life's special moments"


Websites: http://www.mrswags80.etsy.com/


http://www.mrswaggy.etsy.com/


http://www.mgmphotography3.com/


Blog: http://monkeyandabeesittinginatree.blogspot.com/


Wednesday, February 16, 2011

Have you been drooling over all of those beautiful belly shots with the belly bouquets/sashes? Well put your crafty self to work and create your own! Here is how:
Gather your supplies, here I have:


-Stiff felt (This felt is from Michaels and is not the “flimsy” felt, it is more stiff and sturdy”
-Assorted flowers (grab a bouquet of silk flowers, and jars of “belle fleur” from the scrapbooking section, you can also find packs of 6 flat fabric flowers there as well)
-Buttons, rhinestones
-Feathers
-Hot glue and glue gun
-Ribbon
-Whatever else your heart desires!


Now you are going to begin by cutting your felt in a small, medium, or large circle. Here I have cut it about 8x8; this is for a large belly bouquet pictured here:
Next you are going to take your silk flowers from your bouquet and open them up by taking them apart. You will take them apart layer by layer and discard the parts you will not be gluing back together (pictured on the right). This allows your flower to have more volume and to have a cleaner look to them. These are examples of what you will be throwing away (on the right only):
Now you will take the portions of your flower that you saved to the side and hot glue them back together layer by layer. After doing this step glue your flower wherever you would like it to be placed on your felt for your belly bouquet. Note that I glued my rhinestone button in the middle of the flower. If you have chosen a button it will have the portion on the back that you sew the thread through. When gluing buttons on anything make sure you snip that portion off the back so it will lay flat. I do this by using my needle nose pliers. I either snap it off or use the wire cutting portion at the back head of the needle nose pliers. Now place and glue! Here is mine:

Continue adding and gluing your flowers on your entire felt portion, almost done:
Now here we are with all of my flowers glued on, then my feathers, then my rhinestones for flower middles, then my hummingbird for added flare, (note in my blue one I added a little bit of vintage netting). If you have gaps between your flowers and you can see your felt no worries! Just snip it off the back with your scissors OR I like to add some leaves over those gapped areas. If you bought the Belle Fleur cans they will come with leaves in the bottom of the can, not jars.


Now turn it over here is the back side:

Now cut your ribbon, I cut it at about 60 inches or more, you want this to be very long so that it will fit all stages of pregnancy. Find the middle of your felt, find the middle of your ribbon and glue it all along the back portion (ribbon), note-make sure your ribbon is facing right side forward. Ok so it does not look so fancy on the back portion but that is ok.


And voila!
Here it is in action!

Tip- Take your bouquet from belly to baby, very cute on those newborn shoots by placing it on the backside or belly of baby ;)

I hope you enjoyed this tutorial please follow my blog as I am just starting it up and it is a labor of love while my husband is deployed for a year to Afghanistan, Thank you! XO-Amy Jo

You have permission to sell the items made from this tutorial, feel free to share this free tut, I ask that you do not sell this tut or alter the tut and sell as your own. Also please give credit to my blog and Morgans when selling or advertising, thank you.

Tuesday, February 15, 2011

Sugar Snappers Flooring

Ok, hello, I am so in love right now with one of my new purchases! My Sugar Snappers Barnwood Floor overlays! Linky: http://www.sugarsnappers.com/category_1/Floored.htm

Here is a before and after of a photo I took of my precious daughter whom we deemed "chunky" or "monkey" when she was still a wee one.

Before editing AND before Sugar Snappers flooring:


After editing and Sugar Snappers flooring:

The floors come with baseboards as well! These are by far the easiest floor overlays to use and they come complete with easy to follow instructions. Included are horizontal and vertical flooring, it just does not get much easier than this. Awesome!

Friday, February 11, 2011

Thank you for following me!

Hello!
Yes, I am new around here..this blog will be a labor of love for me while my husband is deployed for a year. As you can tell I know nothing about blog templates, etc. So if you have any recommendations as to someone I could turn to for help on customizing my blog I would be grateful!

This blog will feature tutorials on how to make affordable and "easy" photography props and crafts. Occasional photoshop tutorials, my Wagsclan adventures i.e. personal moments, giveaways and other featured crafters. Thank you and join me for the ride!

Wednesday, February 9, 2011

Tutorial for my "RagTag Vintage Headbands"

I want to start off first by thanking Morgan for featuring me as a guest blogger on her fabulous and informative blog! J Today I am sharing with you how to make one of my famous “RagTag Vintage Headbands” as seen in one of my two etsy shops at www.mrswaggy.etsy.com and www.mrswags80.etsy.com  Albert Einstein stated "The secret to creativity is knowing how to hide your sources." I however go against the grain and think that it is better to give than to receive so this is why I will be sharing a series of some of my “how to” crafting tutorials. Let’s begin shall we?
You will need:
- Fabric(s) or your choice
-Fabri Tac Glue and hot glue
-Thread and needle
-Thin elastic
-Adornments i.e. Swarovski’s, feathers, etc.
-Felt
First start off with any scrap of fabric, you really do not need a whole lot of fabric but you do want a fair amount length wise as this is pertinent in making your  vintage flower for your headband. I just buy the fabric quarters used for quilt making at a local Joanne’s fabric; you can even find these at Wal Mart, and Michael’s craft sections. The best thing about it is they are usually a $1.50, super affordable and so many color choices to pick from.  Your fabric quarter will look similar to this:
Start with cutting a small slit at the beginning of your fabric where my finger is pointing, this is at about 1 ½ inches wide.


It should look like this at about 16 inches long. The ripping of the fabric provides frayed edges and gives it that extra vintage feel. The measurements I have provided are for a small to medium sized flower. However you can make the length and width according to your preference.

(Note I changed fabrics only because I wanted a different color) Next fold your fabric in half like so:


Then make a knot like so (make sure the right side of the fabric is facing outward. You will also notice that your know sticks upward more on one side and is more flat on the other side.I am pointing to the top side that will be the bud, the more pointier portion of the knot. Face the flatter side of your knot facing downward. Let the tail from where you made your knot hand downwards as you will be using that piece later:


Next (keeping your fabric folded in half at all times) wrap fabric around the knot. After you have wrapped the initial fabric around the knot, this makes it look more like a bud in the middle of the rosette. Like so:

Then you will continue wrapping your fabric around the knot but you will be twisting your fabric as you go.  The twist is like so (as seen below my pointer finger):


All the while make sure to keep your pointer finger at the top of your bud, and your thumb along the bottom. This helps to keep your rosette in proper placement and keeps it from wrapping to high along the top of the bud.  Like so:

As you are twisting you will be sewing small stitches through your wrapped fabric, this ensures that the flower stays secure and tight and will not unravel once you are done and ready to place your flower on the headband. After all little girls can become rambunctious and we want to ensure their rosettes stay Tasmanian devil proof! Hang in there we are almost done! After continuing this process all the way around you will have a rosette that looks like so:


Stop wrapping when you have about a ½ an inch left of fabric, you will take this fabric tail along with the initial tail and tuck these under your flower, you can secure it with a type of fabric glue or you can stitch it in place, it is all personal preference. You can see the tails facing downward in the above picture. I try to stay as vegan as possible when I can so I stitch it. This tail provides a soft flat surface for placing the vintage rosette on the headband. Here is a picture of the bottom side of the vintage rosette with the tails tucked under.

As for the headband, I like to use 1/8 of an inch of colored elastic for my headband. You can Google basic head sizing charts for headbands. I usually like to make newborn size for my photography props so I cut 13 1/4 inch piece of elastic. Secure the ends of the elastic with fabric glue. I like to use Beacon Adhesives Fabri Tac Permanent Adhesive from Michael’s. It dries very quickly, is not stinky, and has a long lasting hold. Once my headband is dry I attach my flower by either stitching it on or using hot glue. On the underside of the headband I put a felt piece cut out into the shape I desire to provide comfort against that precious wee newborns head.


Now embellish to your hearts content! I usually buy packs of multi colored feathers from Michaels, and a box of faux pearls or Swarovski’s (also from Michael’s) and adorn my headband with these fabulous adornments. Voila! Finished project! Perfect for personal use, or photographic needs. Here is the finished product as a single rosette, or double rosette. Have fun, make it your own!


And a pictue of my beautiful girls wearing Mommy's creations. I just couldn't resist!


I hope that you enjoyed my tutorial please feel free to share it, I just ask that you do not take it and sell it as your own. Thank you and enjoy ;)